# Register a full user
While Guest Users provide a frictionless path to initialize transactions, a seller must have a completely separate **Full User** account to link their banking credentials, clear hosted KYC checks, and receive payouts.
Trustap uses an industry-standard OAuth 2.0 flow to let your platform act securely on a user's behalf without handling their raw credentials.
The flow handles the following four items sequentially.
1. Directing the user to log in or create an autonomous account on Trustap.
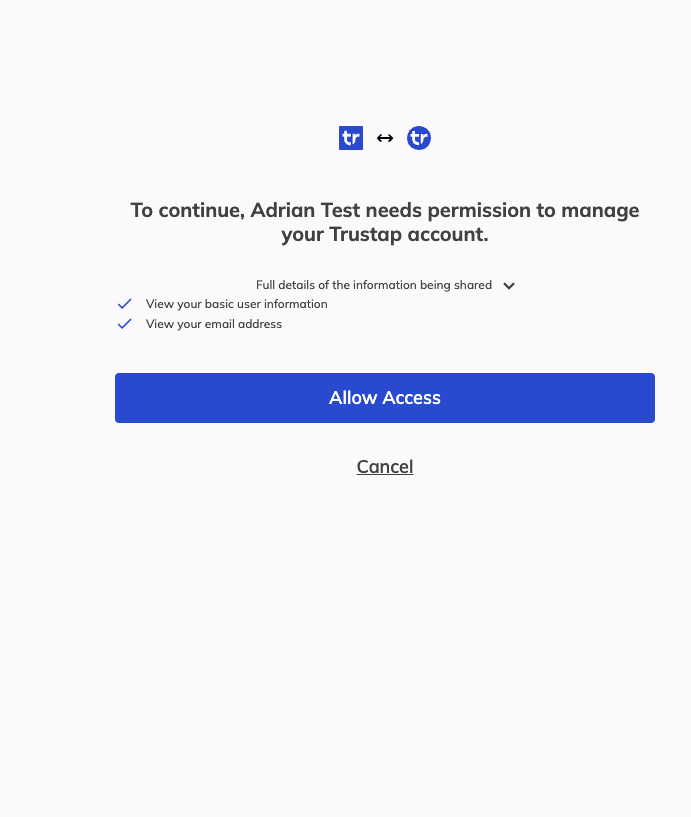
2. Collecting their consent to authorize your application.
3. Passing a secure authorization code back to your server callback.
4. Completing their compliance setup using Trustap's hosted payout verification pages.
## Step 1: Redirect the User to Trustap
Place a **Register with Trustap** or **Configure Payouts** button in your interface. When a user clicks it, redirect them to the Trustap authorization server.
Test environment
```CURL
'Location: https://sso.trustap.com/auth/realms/trustap-stage/protocol/openid-connect/auth'
. '?client_id=' . $CLIENT_ID
. '&redirect_uri=' . $REDIRECT_URI
.'&response_type=code'
. '&state=' . $state
```
Production environment
```CURL
'Location: https://sso.trustap.com/auth/realms/trustap/protocol/openid-connect/auth'
. '?client_id=' . $CLIENT_ID
. '&redirect_uri=' . $REDIRECT_URI
.'&response_type=code'
. '&scope=openid'
. '&state=' . $state
```
The following parameters are used.
| Parameter | Description |
| --- | --- |
| `client_id` | The ID of the client requesting OAuth access to a Trustap account. This is given to you [during your Trustap setup](/docs/intro/auth). |
| `redirect_uri` | A successful response from this endpoint results in a redirect to this URL. Note, wildcards (*) are only supported in the Trustap test environment. In the production environment, you must use a full URL. |
| `response_type` | Tells the authorization server which grant to execute. For authorization, use `response_type=code`. |
| `scope` | Scope is a mechanism in OAuth 2.0 to limit an application's access to a user's account. To create a full Trustap account, use `scope=openid`. |
| `state` | Used to verify the security of the flow. Set the state parameter to a known string and compare with the parameter returned when you receive the authorization code to protect against [CSRF attacks](https://auth0.com/blog/prevent-csrf-attacks-in-oauth-2-implementations/). The state parameter can also be used to pass information about where the user came from, such as a shopping cart ID. |
The following demonstrates a minimal example.
```HTML
Register with Trustap
Register as a Full User on Trustap
```
Use the following tool to generate a registration URL to test your user`s experience. Paste the generated URL into your browser.
## Step 2: User consent
After registration/login, your user must give permission (consent) to the client to perform certain Trustap actions on their behalf.
## Step 3: Handle the Redirect & Exchange Tokens
When the user gives consent, Trustap redirects their browser back to your defined `redirect_uri` with a temporary `code` and the original `state` parameter attached to the query string.
1. Verify the State. Check that the incoming `state` exactly matches the unique string your server generated during Step 1. If it does not match, reject the request to guard against CSRF attacks.
2. Exchange the Code. Make a secure back-channel `POST` request from your backend server to Trustap to exchange the single-use authorization code for access tokens.
Test environment
```CURL
curl -X POST "https://sso.trustap.com/auth/realms/trustap-stage/protocol/openid-connect/token" \
-H "Content-Type: application/x-www-form-urlencoded" \
-d "client_id={client_id}" \
-d "client_secret={client_secret}" \
-d "grant_type=authorization_code" \
-d "code=abcdef123456" \
-d "redirect_uri=https://app.trustap.com/callback"
```
Production environment
```CURL
curl -X POST "https://sso.trustap.com/auth/realms/trustap/protocol/openid-connect/token" \
-H "Content-Type: application/x-www-form-urlencoded" \
-d "client_id={client_id}" \
-d "client_secret={client_secret}" \
-d "grant_type=authorization_code" \
-d "code=abcdef123456" \
-d "redirect_uri=https://app.trustap.com/callback"
```
The response will look like the following.
```JSON
{
"access_token": "eyJhbGciOiJSUzI1NiIsInR5cCIgOiAiSldUIiwia2lkIiA6ICI1ejZ1ZXNicG5ZUVhQZmE1bWlVcURhRkVIOXJqX3AxZm9yLXFxM3JvLVhvIn0.eyJleHAiOjE3NDM0Mjg5MjgsImlhdCI6MTc0MzQyODc0OCwiYXV0aF90aW1lIjoxNzQzNDI3OTI1LCJqdGkiOiIwNzZkZTM2ZC05ZDlkLTQxNTYtOWY5ZC01M2VjZTVkODkxMjAiLCJpc3MiOiJodHRwczovL3Nzby50cnVzdGFwLmNvbS9hdXRoL3JlYWxtcy90cnVzdGFwLXN0YWdlIiwic3ViIjoiNGFjMzJkZjctOTA0Yi00ZDVkLTg5ZWUtMWY5MDdiZjJjZjk0IiwidHlwIjoiQmVhcmVyIiwiYXpwIjoiNWEzZDc5OTAtOWYxYy00ZTExLThkNjctM2RhNWIxNjBjNTBhIiwic2Vzc2lvbl9zdGF0ZSI6IjRlNjcyNDc3LTZiMGQtNDU4Ny1iYTgzLWRlN2M4NWNhYTlhMSIsImFjciI6IjAiLCJhbGxvd2VkLW9yaWdpbnMiOlsiaHR0cHM6Ly90cnVzdGFwLmNvbSJdLCJzY29wZSI6Im9wZW5pZCBwMnBfdHg6b2ZmbGluZV9jb25maXJtX2hhbmRvdmVyIHAycF90eDpvZmZsaW5lX2FjY2VwdF9kZXBvc2l0IHAycF90eDpvZmZsaW5lX2NhbmNlbCBwcm9maWxlIGVtYWlsIHAycF90eDpvZmZsaW5lX2NyZWF0ZV9qb2luIiwic2lkIjoiNGU2NzI0NzctNmIwZC00NTg3LWJhODMtZGU3Yzg1Y2FhOWExIiwiZW1haWxfdmVyaWZpZWQiOmZhbHNlLCJwcmVmZXJyZWRfdXNlcm5hbWUiOiJhZG1pbkB0cnVzdGFwLmNvbSIsImxvY2FsZSI6ImVuIiwiZW1haWwiOiJhZG1pbkB0cnVzdGFwLmNvbSJ9.bcWVV2ypbW2nBtZSMPRrD75FO8HzsnZbrFYk9EUzHLyfNE0uZYnZvHRJbwMpEFWEFQwe4sRqtG0RYODOHHKEbGnqAgjwYXfFodFZnsPj7zruSxpaTXmid5hbUDmn-EhiMnyOCo49snF3lOmbmRKCYp1L8qmN1wOehO6xWVyb-dGADvgw23AWxWzQdQsCqVuccnb-C8MnEfVXeqtZO08MQYeqRp9QoOQQlrv5jdHMeqir7OglTzP51KtxgQ_FZxNll92o8WSgH95nB5DeteoU1MdNonjf4h6VgCOQjJN_uxLiRJIgw4ud4vahN68dQerRLrCLAOMBSbntSgv-j_G0ww",
"expires_in": 180,
"refresh_expires_in": 1800,
"refresh_token": "eyJhbGciOiJIUzI1NiIsInR5cCIgOiAiSldUIiwia2lkIiA6ICI2MjNlYmVlMi00MzZiLTQ1OTYtOGFkMS01ZTBhY2IxOTdmMTMifQ.eyJleHAiOjE3NDM0MzA1NDgsImlhdCI6MTc0MzQyODc0OCwianRpIjoiYmIxNzFjNDEtYjk4OC00YmVmLTgwYTAtOTlkMzBhZDFhZWI0IiwiaXNzIjoiaHR0cHM6Ly9zc28udHJ1c3RhcC5jb20vYXV0aC9yZWFsbXMvdHJ1c3RhcC1zdGFnZSIsImF1ZCI6Imh0dHBzOi8vc3NvLnRydXN0YXAuY29tL2F1dGgvcmVhbG1zL3RydXN0YXAtc3RhZ2UiLCJzdWIiOiI0YWMzMmRmNy05MDRiLTRkNWQtODllZS0xZjkwN2JmMmNmOTQiLCJ0eXAiOiJSZWZyZXNoIiwiYXpwIjoiNWEzZDc5OTAtOWYxYy00ZTExLThkNjctM2RhNWIxNjBjNTBhIiwic2Vzc2lvbl9zdGF0ZSI6IjRlNjcyNDc3LTZiMGQtNDU4Ny1iYTgzLWRlN2M4NWNhYTlhMSIsInNjb3BlIjoib3BlbmlkIHAycF90eDpvZmZsaW5lX2NvbmZpcm1faGFuZG92ZXIgcDJwX3R4Om9mZmxpbmVfYWNjZXB0X2RlcG9zaXQgcDJwX3R4Om9mZmxpbmVfY2FuY2VsIHByb2ZpbGUgZW1haWwgcDJwX3R4Om9mZmxpbmVfY3JlYXRlX2pvaW4iLCJzaWQiOiI0ZTY3MjQ3Ny02YjBkLTQ1ODctYmE4My1kZTdjODVjYWE5YTEifQ.oCcP2sYXQ9eDI94ChH1ddRob0bjS3QvKFWSa1fBXOsU",
"token_type": "Bearer",
"id_token": "eyJhbGciOiJSUzI1NiIsInR5cCIgOiAiSldUIiwia2lkIiA6ICI1ejZ1ZXNicG5ZUVhQZmE1bWlVcURhRkVIOXJqX3AxZm9yLXFxM3JvLVhvIn0.eyJleHAiOjE3NDM0Mjg5MjgsImlhdCI6MTc0MzQyODc0OCwiYXV0aF90aW1lIjoxNzQzNDI3OTI1LCJqdGkiOiI2ODYzNTlkNy1mNTQwLTQ3MzItOGYyMS02ZTY3N2QxZDBlMGEiLCJpc3MiOiJodHRwczovL3Nzby50cnVzdGFwLmNvbS9hdXRoL3JlYWxtcy90cnVzdGFwLXN0YWdlIiwiYXVkIjoiNWEzZDc5OTAtOWYxYy00ZTExLThkNjctM2RhNWIxNjBjNTBhIiwic3ViIjoiNGFjMzJkZjctOTA0Yi00ZDVkLTg5ZWUtMWY5MDdiZjJjZjk0IiwidHlwIjoiSUQiLCJhenAiOiI1YTNkNzk5MC05ZjFjLTRlMTEtOGQ2Ny0zZGE1YjE2MGM1MGEiLCJzZXNzaW9uX3N0YXRlIjoiNGU2NzI0NzctNmIwZC00NTg3LWJhODMtZGU3Yzg1Y2FhOWExIiwiYXRfaGFzaCI6ImJqMU9JOHhHcG5xNFZEc3JOMEhkM3ciLCJhY3IiOiIwIiwic2lkIjoiNGU2NzI0NzctNmIwZC00NTg3LWJhODMtZGU3Yzg1Y2FhOWExIiwiZW1haWxfdmVyaWZpZWQiOmZhbHNlLCJwcmVmZXJyZWRfdXNlcm5hbWUiOiJhZG1pbkB0cnVzdGFwLmNvbSIsImxvY2FsZSI6ImVuIiwiZW1haWwiOiJhZG1pbkB0cnVzdGFwLmNvbSJ9.NgpZJXoWKXzKMGhTII9_ta_DzwxWgFPwNvO9_sTCyRUcFKHOzolKPYTguAHD5FZbYwQcQKzx3ZRjSh0uxVn4YvNv76nt44cs76iqGLwobUsnXTZXbFIPTPMjkPpMLwFADHYjPrHkoip_u_4qs3YXAGb7Xj5-DXmqpM6IDf97TggN7TNgDcFlNWYbgttNf_iU4QFaPHgluVFJ57-ZG9wBGZBJuTXtEZQqkpodR61UsL7So2cVUKuaCFrLDI0VFhr6De9UQI2TFSukavuLuNnCIVvor0I5xHXNePPhbKDysMLL3nN1UfjNXdnyOua3cyRvHkoonnl7GUXIkQez7m9j8A",
"not-before-policy": 0,
"session_state": "4e672477-6b0d-4587-ba83-de7c85caa9a1",
"scope": "openid"
}
```
You can use `access_token` as a Bearer token to make API calls on behalf of your user.
The following demonstrates a simple example.
```CURL
curl -i -X GET \
-H 'Authorization: Bearer ' \
'https://api.test.trustap.com/v2/fees?amount=20000¤cy=usd'
```
## Step 4: Store the Trustap full user ID
To link this new identity to transactions, you must capture the user's permanent Trustap identifier and store it in your own database alongside your local user account records.
The user ID lives inside the `id_token` string included in the token response payload. The ID token is a standard encoded JSON Web Token (JWT). Decode it on your server using any standard JWT utility library to inspect the claims.
```JSON Sample decoded id_token
{
"exp": 1743428928,
"iat": 1743428748,
"auth_time": 1743427925,
"jti": "076de36d-9d9d-4156-9f9d-53ece5d89996",
"iss": "https://sso.trustap.com/auth/realms/trustap-stage",
"sub": "4ac32df7-904b-4d5d-89ee-1f907bf28765",
"typ": "Bearer",
"azp": "5a3d7990-9f1c-4e11-8d67-3da5b160c989",
"session_state": "4e672477-6b0d-4587-ba83-de7c85c897g1",
"acr": "0",
"allowed-origins": [
"https://trustap.com"
],
"scope": "openid",
"sid": "4e672477-6b0d-4587-ba83-de7c899999a1",
"email_verified": false,
"preferred_username": "sarah.garcia@example.shop",
"locale": "en",
"email": "sarah.garcia@example.shop"
}
```
Extract the value of the `sub` (subject) claim. This value represents the permanent, unique Trustap user ID. Pass this string into your transactional payload parameters whenever this seller participates in a trade.
We recommend storing your user information, including your user's Trustap user ID in your own database.
```CURL Example using full user ID as seller_id
curl -i -X POST \
-u ':' \
https://api.test.trustap.com/v2/transactions \
-H 'Content-Type: application/json' \
-d '{
"amount": 20000,
"amount_extra": 0,
"buyer_id": "1-615a70d4-b624-4243-95be-a8367b7953ea",
"currency": "gbp",
"description": "Trustap socks",
"fees_buyer": 640,
"fees_config": 1,
"fees_seller": 0,
"image_url": "https://docs.trustap.com/images/trustap-socks.png",
"payment_method": "card",
"seller_id": "4ac32df7-904b-4d5d-89ee-1f907bf28765"
}'
```
## Step 5. Redirect the seller back to Trustap’s profile completion page
Once you have verified the user token and recorded their ID, redirect the user browser to Trustap's hosted profile application. This step allows them to configure their payout bank accounts and clear their required [KYC checks](/docs/guides/transactions/users#kyc-requirements) safely on Trustap's domain.
Test environment
```
https://app.stage.trustap.com/profile/payout/personal?edit=true&client_id={CLIENT_ID}
```
Production environment
```
https://app.trustap.com/profile/payout/personal?edit=true&client_id={CLIENT_ID}
```
When redirecting a user to the Trustap login page, add a `login_hint` query parameter to the authorization URL, set to that user's email address. The login form will load with the email field already filled in, so the user doesn't have to type it.
```
https://app.stage.trustap.com/profile/payout/personal?edit=true&client_id={CLIENT_ID}&login_hint={user_email}
```
## More information
To support your understanding of OAuth, we recommend following the **Authorization Code** path in the [OAuth playground](https://www.oauth.com/playground/).