
Trustap supports two types of users.
- Guest Users – Limited functionality, cannot receive payouts.
- Full Users – Have a Trustap account and can receive payouts (required for sellers).
To reduce friction, we recommend using guest users for sellers. When a seller is ready to receive their payout, create a Trustap full user. The seller's full Trustap account can claim the transaction and receive their payout.
Follow this guide to create a full Trustap user using the the Trustap OAuth flow.
OAuth (Open Authorization) is an industry-standard protocol for authorization that allows applications to access user data from other services without exposing credentials.
Trustap uses an OAuth flow to do the following.
- Guide users to create their Trustap account (or log into an existing Trustap account)
- Give consent to you to use their account on their behalf
- Pass appropriate access back to you
- Direct the user to complete their registration by adding their payout details to the Trustap app.
Following the flow, you will be able to complete transactions on behalf of your user and your user will be able to receive payouts.
In your app, create a button “Register with Trustap”. Use this button to redirect your user to the Trustap authorization server.
'Location: https://sso.trustap.com/auth/realms/trustap-stage/protocol/openid-connect/auth'
. '?client_id=' . $CLIENT_ID
. '&redirect_uri=' . $REDIRECT_URI
.'&response_type=code'
. '&scope=openid p2p_tx:offline_create_join p2p_tx:offline_accept_deposit p2p_tx:offline_cancel p2p_tx:offline_confirm_handover’
. '&state=' . $state
The following parameters are used.
| Parameter | Description |
|---|---|
client_id | The ID of the client requesting OAuth access to a Trustap account. This is given to you with your authorization credentials. |
redirect_uri | A successful response from this endpoint results in a redirect to this URL. Note, wildcards (*) are only supported in the Trustap test environment. In the production environment, you must use a full URL. |
response_type | Tells the authorization server which grant to execute. For authorization, use response_type=code. |
scope | Scope is a mechanism in OAuth 2.0 to limit an application's access to a user's account. An application can request one or more scopes, this information is then presented to the user in the consent screen, and the access token issued to the application will be limited to the scopes granted. See scopes for more details. |
state | Used to verify the security of the flow. Set the state parameter to a known string and compare with the parameter returned when you receive the authorization code to protect against CSRF attacks. The state parameter can also be used to pass information about where the user came from, such as a shopping cart ID. |
The following demonstrates a minimal example.
<!DOCTYPE html>
<html lang="en">
<head>
    <meta charset="UTF-8">
    <meta name="viewport" content="width=device-width, initial-scale=1.0">
    <title>Register with Trustap</title>
</head>
<body>
    <h2>Register as a Full User on Trustap</h2>
    <button onclick="redirectToTrustap()">Register with Trustap</button>

    <script>
        function redirectToTrustap() {
            // Replace these values with your actual credentials
            const clientId = "65697990-9f1c-4e11-8d67-12345160c50a";
            const redirectUri = encodeURIComponent("https://mymarkt.com/*");
            const state = "random_state_string"; // This should be a random unique string for security

            // Define the scopes needed
            const scope = encodeURIComponent("openid p2p_tx:offline_create_join p2p_tx:offline_accept_deposit p2p_tx:offline_cancel p2p_tx:offline_confirm_handover");

            // Construct the Trustap authentication URL
            let realm = "trustap-stage";
            if (isProduction) {
                realm = "trustap";
            }
            const trustapAuthUrl = `https://sso.trustap.com/auth/realms/${realm}/protocol/openid-connect/auth?client_id=${clientId}&redirect_uri=${redirectUri}&response_type=code&scope=${scope}&state=${state}`;

            // Redirect the user to Trustap
            window.location.href = trustapAuthUrl;
        }
    </script>
</body>
</html>
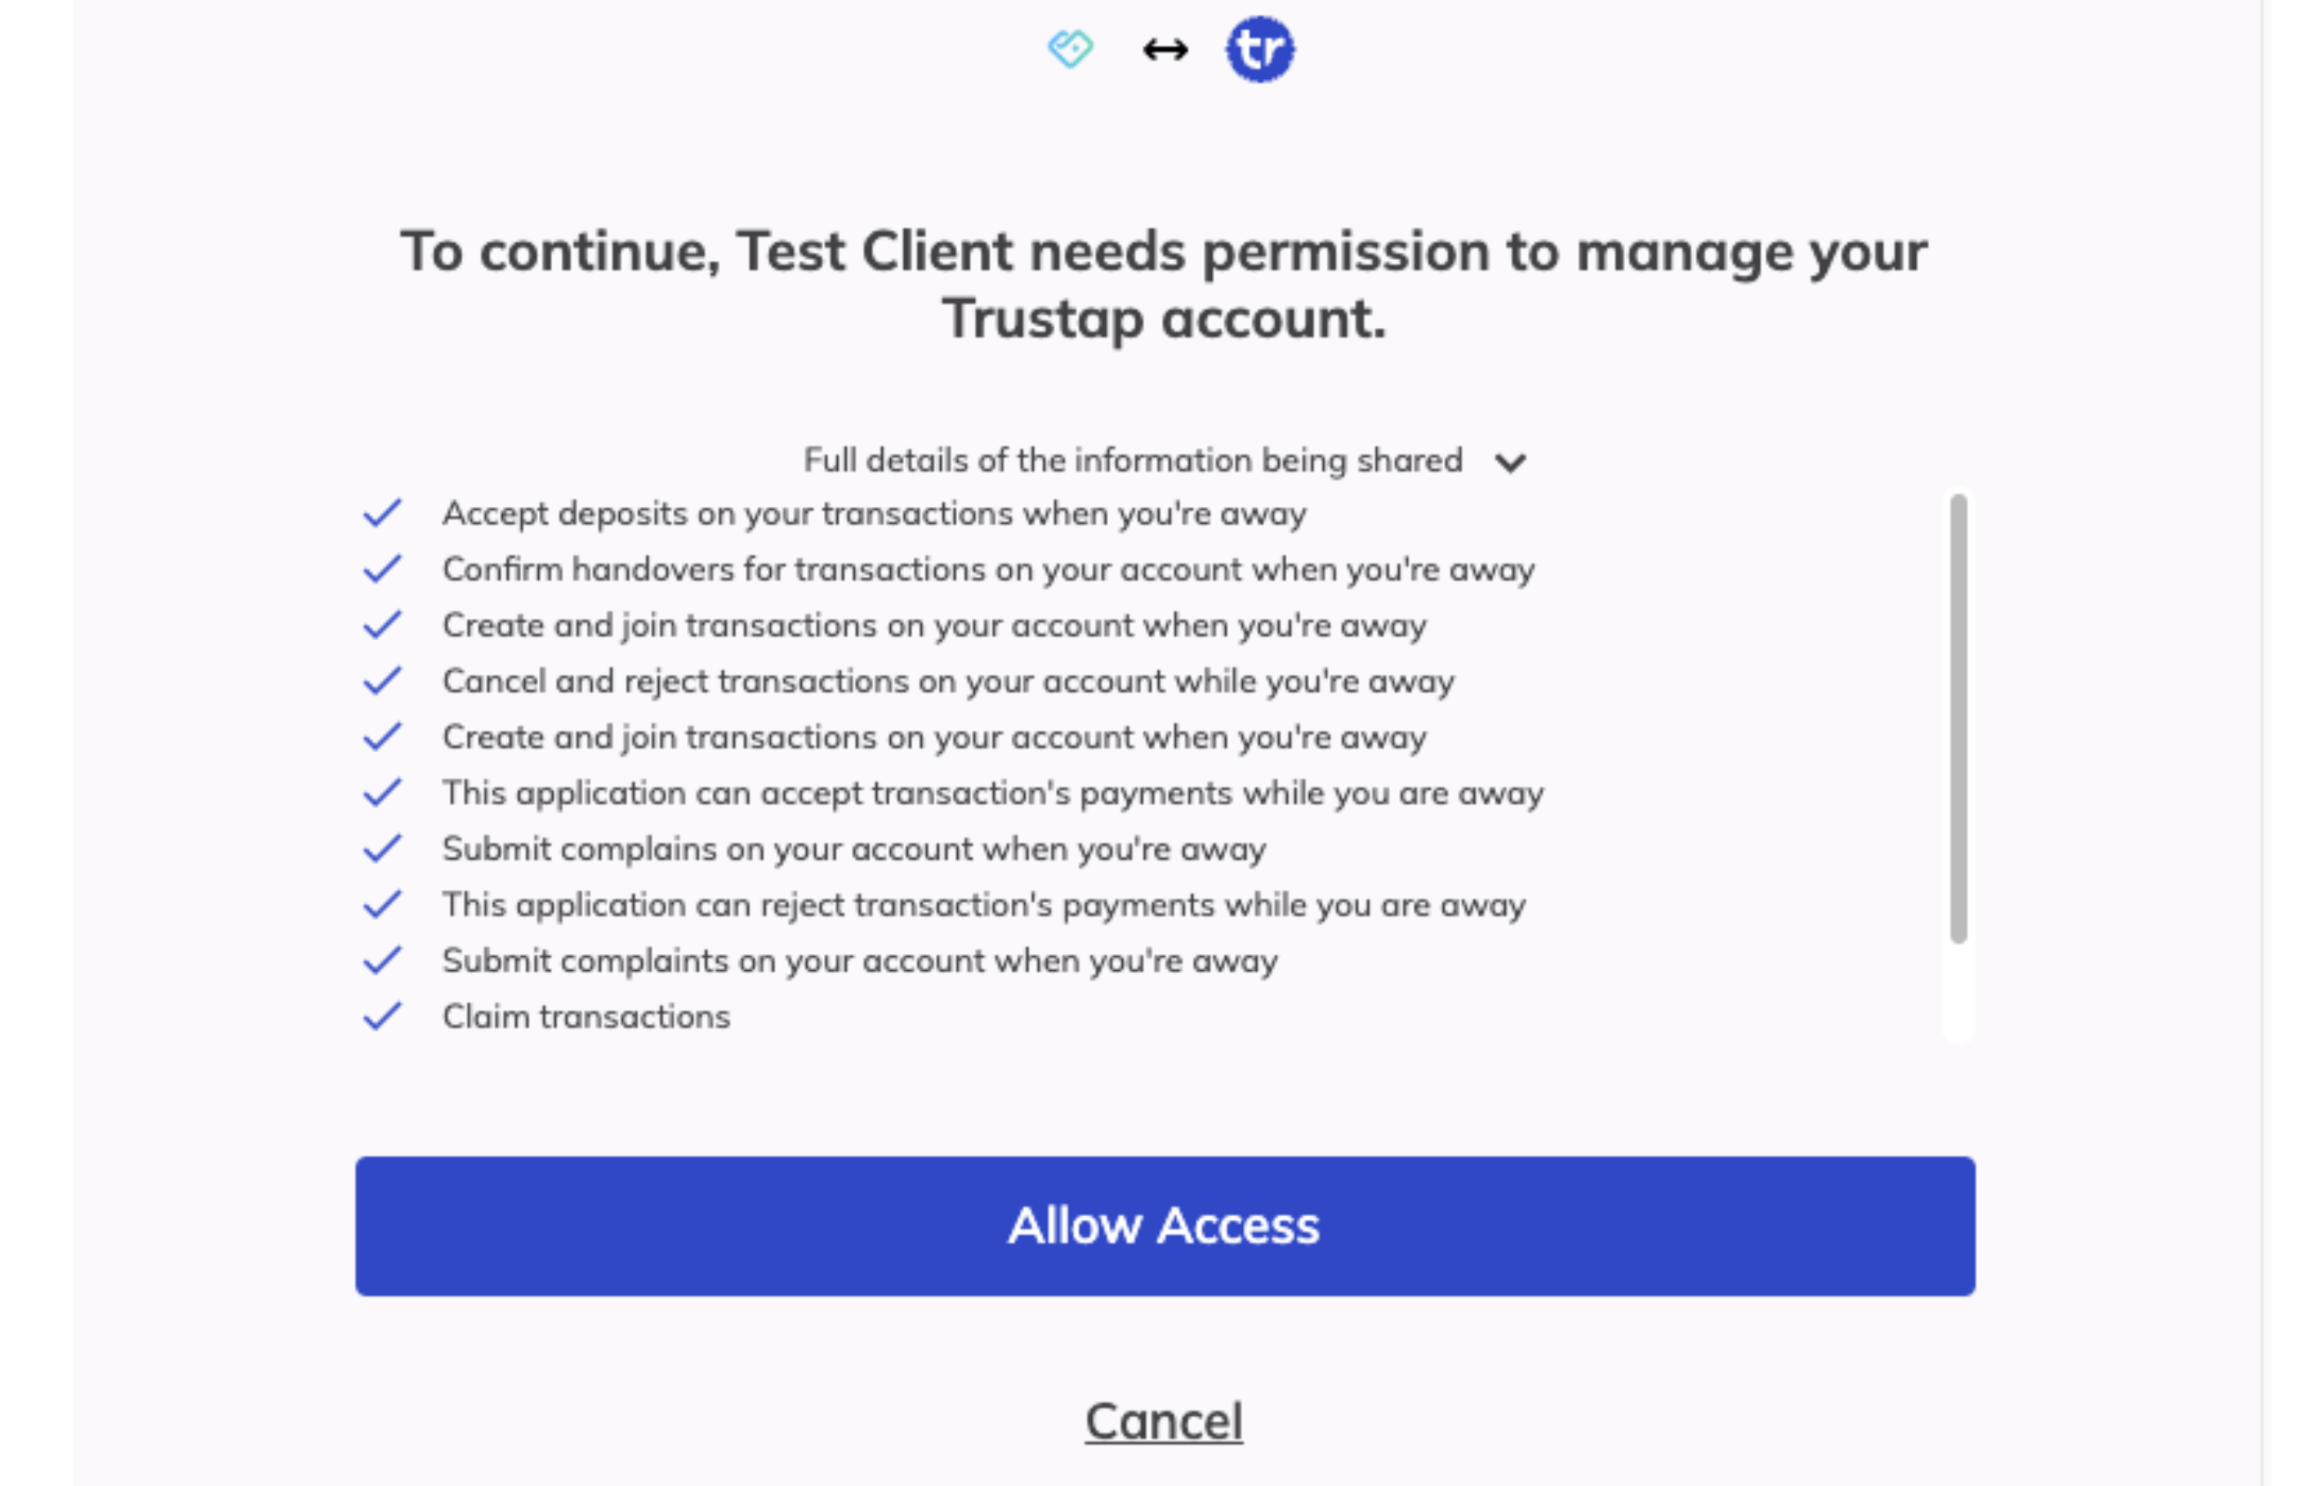
Scopes define the specific actions applications can be allowed to do on a user's behalf. The following scopes are available for Trustap users.
| Scope | Description |
|---|---|
openid | This client is making an OpenID Connect request. |
p2p_tx:offline_accept_deposit | This client may accept deposits for face-to-face transactions on the user's behalf while the user is offline. |
p2p_tx:offline_cancel | This client may cancel face-to-face transactions on the user's behalf while the user is offline. |
p2p_tx:offline_claim | This client may claim face-to-face transactions on the user's behalf while the user is offline. |
p2p_tx:offline_complain | This client may submit complaints for face-to-face transactions on the user's behalf while the user is offline. |
p2p_tx:offline_confirm_handover | This client may confirm handovers for face-to-face transactions on the user's behalf while the user is offline. |
p2p_tx:offline_create_join | This client may create and join face-to-face transactions on the user's behalf while the user is offline. |
p2p_tx:offline_set_price | This client may set the price for face-to-face transactions on the user's behalf while the user is offline. |
profile | This client may access the user's default profile claims: name, family_name, given_name, middle_name, nickname, preferred_username, profile, picture, website, gender, birthdate, zoneinfo, locale, and updated_at. |
Use the following tool to generate a registration URL to test your user`s experience. Paste the generated URL into your browser.
https://sso.trustap.com/auth/realms/trustap-stage/protocol/openid-connect/auth?client_id=&redirect_uri=&response_type=code&scope=openid%20p2p_tx%3Aoffline_create_join%20p2p_tx%3Aoffline_accept_deposit%20p2p_tx%3Aoffline_cancel%20p2p_tx%3Aoffline_confirm_handover&state=random_state_stringAfter registration/login, your user must give permission (consent) to the client to perform certain Trustap actions on their behalf. The scopes define what actions can be performed using the API (like creating/joining transactions, accepting transactions, and so on).
When the user registers and gives consent, Trustap redirects the user to the redirect URI. Included in the redirect is a state parameter and a code parameter.
First verify that the
stateparameter matches the value stored from step 1. This protects against CSRF attacks, as mentioned above.Next, exchange the authorization
codefor an access token. Your server exchanges this code for access tokens by making a POST request to Trustap.
curl -X POST "https://sso.trustap.com/auth/realms/trustap-stage/protocol/openid-connect/token" \
  -H "Content-Type: application/x-www-form-urlencoded" \
  -d "client_id={client_id}" \
  -d "client_secret={client_secret}" \
  -d "grant_type=authorization_code" \
  -d "code=abcdef123456" \
  -d "redirect_uri=https://app.trustap.com/callback"
The response will look like the following.
{
  "access_token": "eyJhbGciOiJSUzI1NiIsInR5cCIgOiAiSldUIiwia2lkIiA6ICI1ejZ1ZXNicG5ZUVhQZmE1bWlVcURhRkVIOXJqX3AxZm9yLXFxM3JvLVhvIn0.eyJleHAiOjE3NDM0Mjg5MjgsImlhdCI6MTc0MzQyODc0OCwiYXV0aF90aW1lIjoxNzQzNDI3OTI1LCJqdGkiOiIwNzZkZTM2ZC05ZDlkLTQxNTYtOWY5ZC01M2VjZTVkODkxMjAiLCJpc3MiOiJodHRwczovL3Nzby50cnVzdGFwLmNvbS9hdXRoL3JlYWxtcy90cnVzdGFwLXN0YWdlIiwic3ViIjoiNGFjMzJkZjctOTA0Yi00ZDVkLTg5ZWUtMWY5MDdiZjJjZjk0IiwidHlwIjoiQmVhcmVyIiwiYXpwIjoiNWEzZDc5OTAtOWYxYy00ZTExLThkNjctM2RhNWIxNjBjNTBhIiwic2Vzc2lvbl9zdGF0ZSI6IjRlNjcyNDc3LTZiMGQtNDU4Ny1iYTgzLWRlN2M4NWNhYTlhMSIsImFjciI6IjAiLCJhbGxvd2VkLW9yaWdpbnMiOlsiaHR0cHM6Ly90cnVzdGFwLmNvbSJdLCJzY29wZSI6Im9wZW5pZCBwMnBfdHg6b2ZmbGluZV9jb25maXJtX2hhbmRvdmVyIHAycF90eDpvZmZsaW5lX2FjY2VwdF9kZXBvc2l0IHAycF90eDpvZmZsaW5lX2NhbmNlbCBwcm9maWxlIGVtYWlsIHAycF90eDpvZmZsaW5lX2NyZWF0ZV9qb2luIiwic2lkIjoiNGU2NzI0NzctNmIwZC00NTg3LWJhODMtZGU3Yzg1Y2FhOWExIiwiZW1haWxfdmVyaWZpZWQiOmZhbHNlLCJwcmVmZXJyZWRfdXNlcm5hbWUiOiJhZG1pbkB0cnVzdGFwLmNvbSIsImxvY2FsZSI6ImVuIiwiZW1haWwiOiJhZG1pbkB0cnVzdGFwLmNvbSJ9.bcWVV2ypbW2nBtZSMPRrD75FO8HzsnZbrFYk9EUzHLyfNE0uZYnZvHRJbwMpEFWEFQwe4sRqtG0RYODOHHKEbGnqAgjwYXfFodFZnsPj7zruSxpaTXmid5hbUDmn-EhiMnyOCo49snF3lOmbmRKCYp1L8qmN1wOehO6xWVyb-dGADvgw23AWxWzQdQsCqVuccnb-C8MnEfVXeqtZO08MQYeqRp9QoOQQlrv5jdHMeqir7OglTzP51KtxgQ_FZxNll92o8WSgH95nB5DeteoU1MdNonjf4h6VgCOQjJN_uxLiRJIgw4ud4vahN68dQerRLrCLAOMBSbntSgv-j_G0ww",
  "expires_in": 180,
  "refresh_expires_in": 1800,
  "refresh_token": "eyJhbGciOiJIUzI1NiIsInR5cCIgOiAiSldUIiwia2lkIiA6ICI2MjNlYmVlMi00MzZiLTQ1OTYtOGFkMS01ZTBhY2IxOTdmMTMifQ.eyJleHAiOjE3NDM0MzA1NDgsImlhdCI6MTc0MzQyODc0OCwianRpIjoiYmIxNzFjNDEtYjk4OC00YmVmLTgwYTAtOTlkMzBhZDFhZWI0IiwiaXNzIjoiaHR0cHM6Ly9zc28udHJ1c3RhcC5jb20vYXV0aC9yZWFsbXMvdHJ1c3RhcC1zdGFnZSIsImF1ZCI6Imh0dHBzOi8vc3NvLnRydXN0YXAuY29tL2F1dGgvcmVhbG1zL3RydXN0YXAtc3RhZ2UiLCJzdWIiOiI0YWMzMmRmNy05MDRiLTRkNWQtODllZS0xZjkwN2JmMmNmOTQiLCJ0eXAiOiJSZWZyZXNoIiwiYXpwIjoiNWEzZDc5OTAtOWYxYy00ZTExLThkNjctM2RhNWIxNjBjNTBhIiwic2Vzc2lvbl9zdGF0ZSI6IjRlNjcyNDc3LTZiMGQtNDU4Ny1iYTgzLWRlN2M4NWNhYTlhMSIsInNjb3BlIjoib3BlbmlkIHAycF90eDpvZmZsaW5lX2NvbmZpcm1faGFuZG92ZXIgcDJwX3R4Om9mZmxpbmVfYWNjZXB0X2RlcG9zaXQgcDJwX3R4Om9mZmxpbmVfY2FuY2VsIHByb2ZpbGUgZW1haWwgcDJwX3R4Om9mZmxpbmVfY3JlYXRlX2pvaW4iLCJzaWQiOiI0ZTY3MjQ3Ny02YjBkLTQ1ODctYmE4My1kZTdjODVjYWE5YTEifQ.oCcP2sYXQ9eDI94ChH1ddRob0bjS3QvKFWSa1fBXOsU",
  "token_type": "Bearer",
  "id_token": "eyJhbGciOiJSUzI1NiIsInR5cCIgOiAiSldUIiwia2lkIiA6ICI1ejZ1ZXNicG5ZUVhQZmE1bWlVcURhRkVIOXJqX3AxZm9yLXFxM3JvLVhvIn0.eyJleHAiOjE3NDM0Mjg5MjgsImlhdCI6MTc0MzQyODc0OCwiYXV0aF90aW1lIjoxNzQzNDI3OTI1LCJqdGkiOiI2ODYzNTlkNy1mNTQwLTQ3MzItOGYyMS02ZTY3N2QxZDBlMGEiLCJpc3MiOiJodHRwczovL3Nzby50cnVzdGFwLmNvbS9hdXRoL3JlYWxtcy90cnVzdGFwLXN0YWdlIiwiYXVkIjoiNWEzZDc5OTAtOWYxYy00ZTExLThkNjctM2RhNWIxNjBjNTBhIiwic3ViIjoiNGFjMzJkZjctOTA0Yi00ZDVkLTg5ZWUtMWY5MDdiZjJjZjk0IiwidHlwIjoiSUQiLCJhenAiOiI1YTNkNzk5MC05ZjFjLTRlMTEtOGQ2Ny0zZGE1YjE2MGM1MGEiLCJzZXNzaW9uX3N0YXRlIjoiNGU2NzI0NzctNmIwZC00NTg3LWJhODMtZGU3Yzg1Y2FhOWExIiwiYXRfaGFzaCI6ImJqMU9JOHhHcG5xNFZEc3JOMEhkM3ciLCJhY3IiOiIwIiwic2lkIjoiNGU2NzI0NzctNmIwZC00NTg3LWJhODMtZGU3Yzg1Y2FhOWExIiwiZW1haWxfdmVyaWZpZWQiOmZhbHNlLCJwcmVmZXJyZWRfdXNlcm5hbWUiOiJhZG1pbkB0cnVzdGFwLmNvbSIsImxvY2FsZSI6ImVuIiwiZW1haWwiOiJhZG1pbkB0cnVzdGFwLmNvbSJ9.NgpZJXoWKXzKMGhTII9_ta_DzwxWgFPwNvO9_sTCyRUcFKHOzolKPYTguAHD5FZbYwQcQKzx3ZRjSh0uxVn4YvNv76nt44cs76iqGLwobUsnXTZXbFIPTPMjkPpMLwFADHYjPrHkoip_u_4qs3YXAGb7Xj5-DXmqpM6IDf97TggN7TNgDcFlNWYbgttNf_iU4QFaPHgluVFJ57-ZG9wBGZBJuTXtEZQqkpodR61UsL7So2cVUKuaCFrLDI0VFhr6De9UQI2TFSukavuLuNnCIVvor0I5xHXNePPhbKDysMLL3nN1UfjNXdnyOua3cyRvHkoonnl7GUXIkQez7m9j8A",
  "not-before-policy": 0,
  "session_state": "4e672477-6b0d-4587-ba83-de7c85caa9a1",
  "scope": "openid p2p_tx:offline_confirm_handover p2p_tx:offline_accept_deposit p2p_tx:offline_cancel profile email p2p_tx:offline_create_join"
}
You can use access_token as a Bearer token to make API calls on behalf of your user. The following demonstrates a simple example.
curl -i -X GET \
  'https://dev.stage.trustap.com/api/v1/charge?currency=eur&price=1000' \
-H 'Authorization: Bearer <YOUR_TOKEN_HERE>'We recommend storing your user information, including your user's Trustap user ID in your own database.
The user ID is retrieved from id_token that in the response/payload that contains your access token.
The ID token is encoded as a JWT. Decode id_token using a JWT decoder.
{
  "exp": 1743428928,
  "iat": 1743428748,
  "auth_time": 1743427925,
  "jti": "076de36d-9d9d-4156-9f9d-53ece5d89996",
  "iss": "https://sso.trustap.com/auth/realms/trustap-stage",
  "sub": "4ac32df7-904b-4d5d-89ee-1f907bf28765",
  "typ": "Bearer",
  "azp": "5a3d7990-9f1c-4e11-8d67-3da5b160c989",
  "session_state": "4e672477-6b0d-4587-ba83-de7c85c897g1",
  "acr": "0",
  "allowed-origins": [
    "https://trustap.com"
  ],
  "scope": "openid p2p_tx:offline_confirm_handover p2p_tx:offline_accept_deposit p2p_tx:offline_cancel profile email p2p_tx:offline_create_join",
  "sid": "4e672477-6b0d-4587-ba83-de7c899999a1",
  "email_verified": false,
  "preferred_username": "sarah.garcia@mail.com",
  "locale": "en",
  "email": "sarah.garcia@mail.com"
}
Use the sub claim as the user’s unique ID.
curl --location 'https://dev.stage.trustap.com/api/v1/p2p/me/transactions/create_with_guest_user' \
--header 'Trustap-User: 4ac32df7-904b-4d5d-89ee-1f907bf28765' \
--header 'Content-Type: application/json' \
--user '<API_KEY>:' \
--data '{
"seller_id": "4ac32df7-904b-4d5d-89ee-1f907bf28765",
"buyer_id": "1-615a70d4-b624-4243-95be-a8367b7953ea",
"creator_role": "seller",
"currency": "gbp",
"description": "Ireland vs Croatia UEFA Nations League",
"deposit_price": 20000,
"deposit_charge": 820,
"charge_calculator_version": 3,
"skip_remainder": true,
"image_url": "https://docs.trustap.com/images/soccer-tickets.png"
}'For your seller to receive payout, they must share their personal details including bank details with Trustap.
https://app.stage.trustap.com/profile/payout/personal?edit=true&client_id={CLIENT_ID}To support your understanding of OAuth, we recommend following the Authorization Code path in the OAuth playground.